Overview
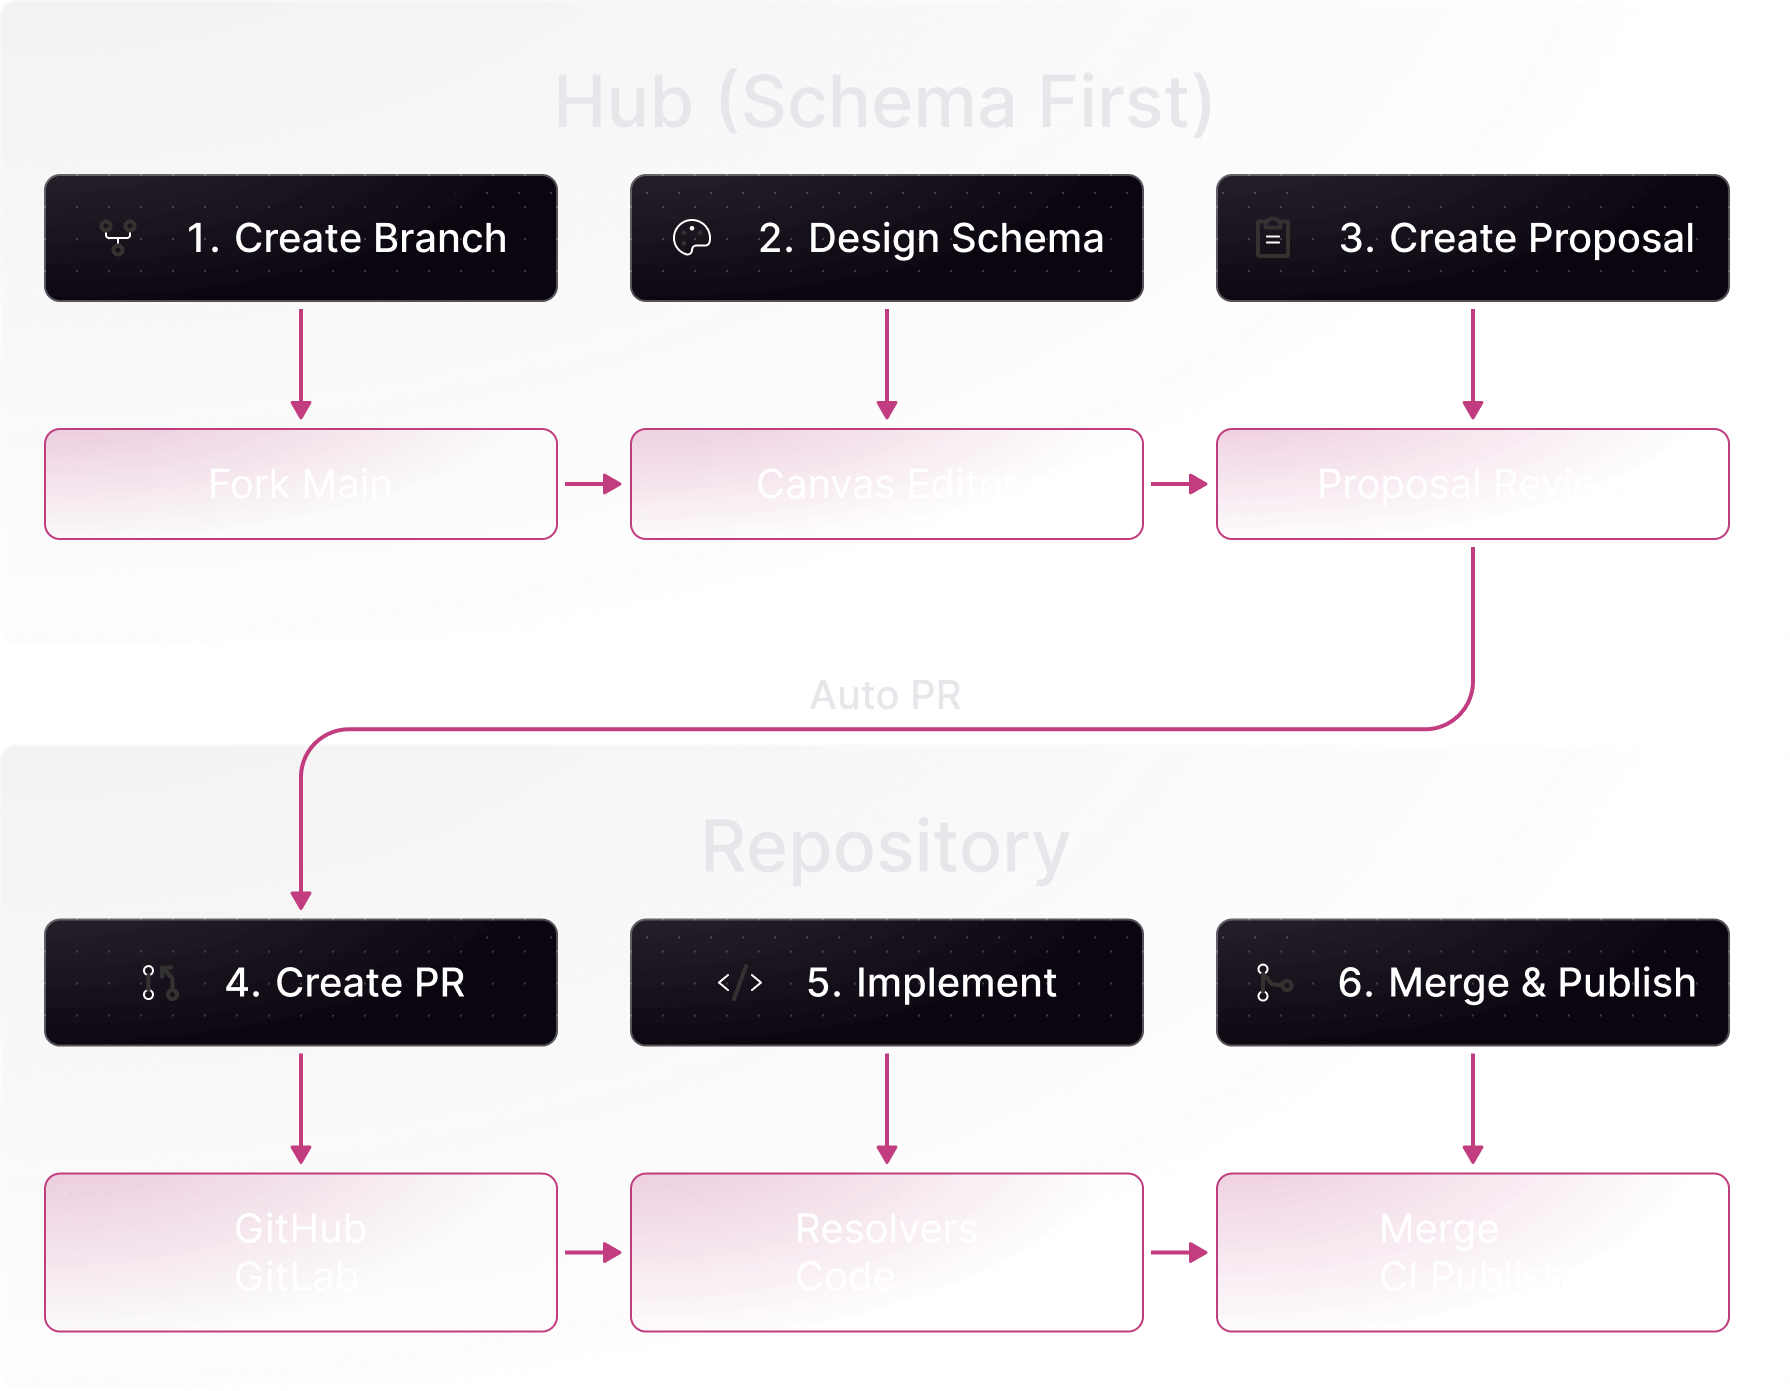
In the Schema First workflow:- Design schemas visually in Hub using the canvas
- Create a proposal for review and governance
- Sync automatically creates PRs in your repositories
- Collaborate using Hub’s visual tools and governance features
- Approve and merge the PR once the proposal is approved
- Publish the schema to your registry via CI
- Want to design APIs visually before implementation
- Need frontend and backend teams to work in parallel
- Prefer defining the contract first, then implementing
- Want non-developers (architects, PMs) involved in API design
- Require governance and review processes for schema changes
Prerequisites
Before starting, ensure you have:- A WunderGraph Hub account with an organization
- A graph created in Hub with subgraphs defined
- GitHub or GitLab connected to Hub
- Subgraph-to-repository mappings configured
Step-by-Step Guide
Step 1: Connect Your Repository
Connect your GitHub or GitLab repository to enable automatic schema syncing.- Navigate to Settings → Integrations in your organization
- Click Connect GitHub or Connect GitLab
- Authorize the application and select your repositories
Step 2: Configure Subgraph Mappings
Map each subgraph in your graph to a specific repository and file path.- Open your graph in Hub
- Click the dropdown in the top-left corner
- Select Integrations → Git
- For each subgraph, configure:
- Repository: Select the target repository
- File Path: Specify where the schema file should be stored
- Click Save Mappings
An initialization PR will be created in each mapped repository containing the current subgraph schema.
Step 3: Design Your Schema
Use Hub’s visual canvas to design your schema changes.- Create a branch by forking the main branch on hub to work in isolation
- Design on the canvas: Add types, fields, and relationships visually
Step 4: Create a Proposal
Once your schema changes are ready, create a proposal for review and governance.- Navigate to the Proposal tab
- Click Create Proposal
- Select collections to analyze for operation impact
- Click Create Proposal
- Creates a branch in each mapped repository matching your Hub branch name
- Commits schema files to the new branch
- Opens a pull request with the schema changes
Your development team can now review schema changes in GitHub/GitLab, start implementing resolvers, and run CI/CD pipelines against the new schemas.
Step 5: Review and Govern in Hub
Use Hub’s visual tools and governance features to review and collaborate on the changes.- Review visually using the canvas to see type relationships
- Check validations:
- Composition checks
- Breaking change detection
- Lint errors
- Operation impact analysis
- Collaborate using Hub’s discussion features with stakeholders
- Governance:
- Require approvals from designated reviewers before publishing
- Ensure all checks pass before the proposal can proceed
- Track who reviewed and approved schema changes
Step 6: Iterate on Changes
Continue designing in Hub. Each change automatically syncs to the PR.- Make additional changes in Hub’s canvas or schema editor
- Hub automatically updates the corresponding pull request
- Validations re-run with each update
- PR state syncs with proposal state (draft, open, closed)
Step 7: Approve, Merge, and Publish
Once the proposal passes all checks and is approved:- Approve the proposal in Hub
- Merge the PR in GitHub/GitLab
- CI publishes the schema to your registry (Cosmo or Apollo GraphOS)
- Hub detects the publish and marks the proposal as published
Workflow Diagram