> ## Documentation Index
> Fetch the complete documentation index at: https://hub-docs.wundergraph.com/llms.txt
> Use this file to discover all available pages before exploring further.
# Schema First Approach
> Design and manage your GraphQL schemas visually in Hub, then sync to your codebase and schema registry
## Overview
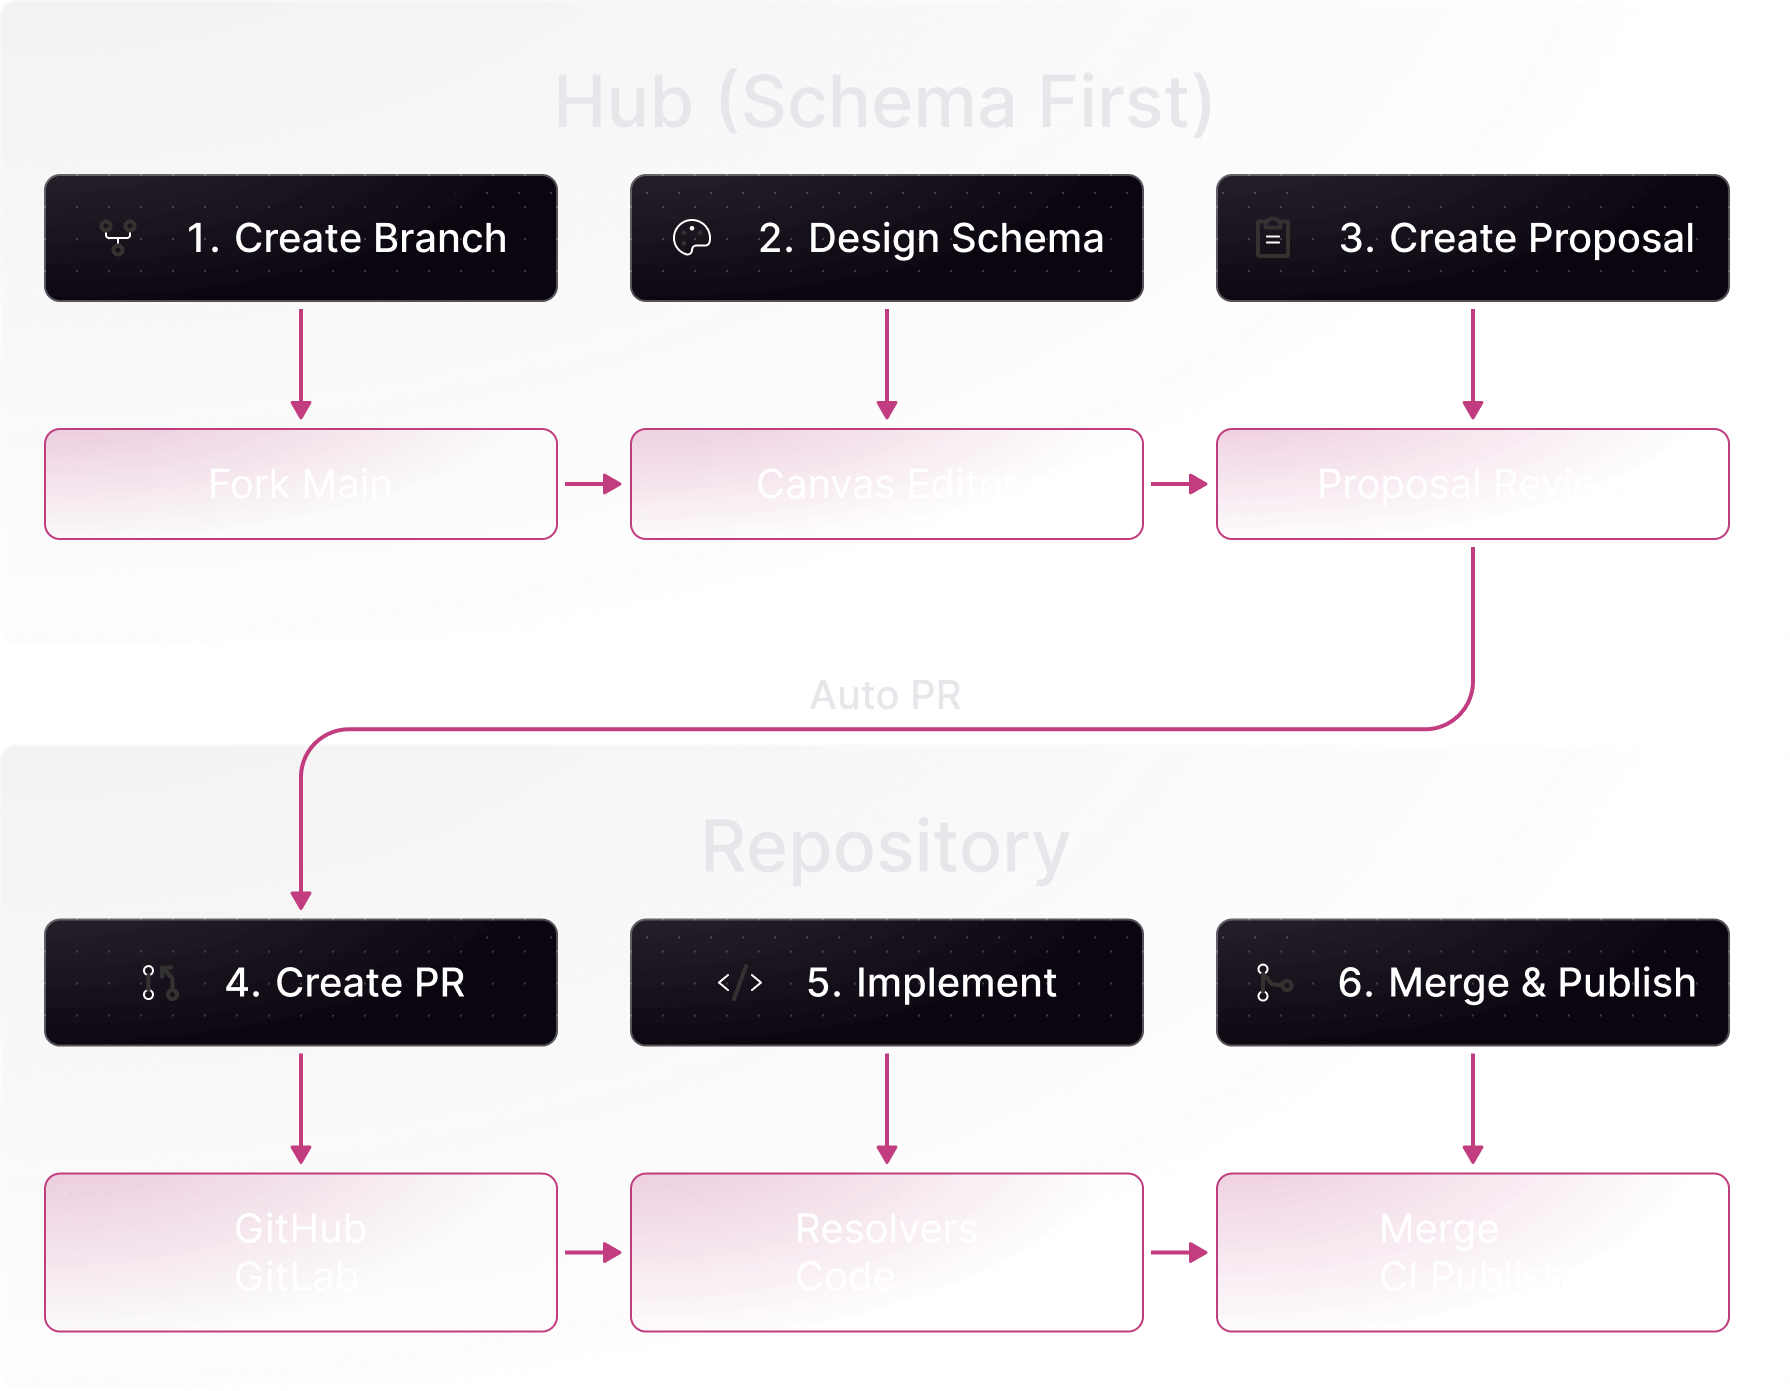
In the Schema First workflow:
1. **Design** schemas visually in Hub using the canvas
2. **Create** a proposal for review and governance
3. **Sync** automatically creates PRs in your repositories
4. **Collaborate** using Hub's visual tools and governance features
5. **Approve** and merge the PR once the proposal is approved
6. **Publish** the schema to your registry via CI
This approach is ideal for teams who:
* Want to design APIs visually before implementation
* Need frontend and backend teams to work in parallel
* Prefer defining the contract first, then implementing
* Want non-developers (architects, PMs) involved in API design
* Require governance and review processes for schema changes
## Prerequisites
Before starting, ensure you have:
* A WunderGraph Hub account with an organization
* A graph created in Hub with subgraphs defined
* GitHub or GitLab connected to Hub
* Subgraph-to-repository mappings configured
The Schema First approach treats Hub as the source of truth for your GraphQL schema. Instead of writing schemas in code or text files, you design and evolve your API visually using Hub's canvas—defining types, fields, and relationships in an intuitive interface before any implementation begins.
This approach is popular with teams who want to design their API contract upfront, enabling frontend and backend teams to work in parallel. Product managers, architects, and developers can collaborate on the schema design using Hub's visual tools, and once approved, the schema automatically syncs to your code repositories where developers can implement the resolvers.
With Hub's two-way sync, schema changes flow automatically to your GitHub or GitLab repositories as pull requests. This bridges the gap between visual design and implementation, ensuring that every schema change goes through proper review and validation before reaching production.
## Step-by-Step Guide
### Step 1: Connect Your Repository
Connect your GitHub or GitLab repository to enable automatic schema syncing.
1. Navigate to **Settings** → **Integrations** in your organization
2. Click **Connect GitHub** or **Connect GitLab**
3. Authorize the application and select your repositories
### Step 2: Configure Subgraph Mappings
Map each subgraph in your graph to a specific repository and file path.
1. Open your graph in Hub
2. Click the dropdown in the top-left corner
3. Select **Integrations** → **Git**
4. For each subgraph, configure:
* **Repository**: Select the target repository
* **File Path**: Specify where the schema file should be stored
5. Click **Save Mappings**
An initialization PR will be created in each mapped repository containing the current subgraph schema.
### Step 3: Design Your Schema
Use Hub's visual canvas to design your schema changes.
1. **Create a branch** by forking the main branch on hub to work in isolation
2. **Design on the canvas**: Add types, fields, and relationships visually
### Step 4: Create a Proposal
Once your schema changes are ready, create a proposal for review and governance.
1. Navigate to the **Proposal** tab
2. Click **Create Proposal**
3. Select collections to analyze for operation impact
4. Click **Create Proposal**
When you create a proposal, Hub automatically:
1. **Creates a branch** in each mapped repository matching your Hub branch name
2. **Commits schema files** to the new branch
3. **Opens a pull request** with the schema changes
Your development team can now review schema changes in GitHub/GitLab, start implementing resolvers, and run CI/CD pipelines against the new schemas.
### Step 5: Review and Govern in Hub
Use Hub's visual tools and governance features to review and collaborate on the changes.
1. **Review visually** using the canvas to see type relationships
2. **Check validations**:
* Composition checks
* Breaking change detection
* Lint errors
* Operation impact analysis
3. **Collaborate** using Hub's discussion features with stakeholders
4. **Governance**:
* Require approvals from designated reviewers before publishing
* Ensure all checks pass before the proposal can proceed
* Track who reviewed and approved schema changes
### Step 6: Iterate on Changes
Continue designing in Hub. Each change automatically syncs to the PR.
1. **Make additional changes** in Hub's canvas or schema editor
2. **Hub automatically updates** the corresponding pull request
3. **Validations re-run** with each update
4. **PR state syncs** with proposal state (draft, open, closed)
Hub compares schemas before syncing. If the schema content is identical, no update occurs—preventing unnecessary noise in your workflow.
### Step 7: Approve, Merge, and Publish
Once the proposal passes all checks and is approved:
1. **Approve** the proposal in Hub
2. **Merge** the PR in GitHub/GitLab
3. **CI publishes** the schema to your registry (Cosmo or Apollo GraphOS)
4. Hub detects the publish and marks the **proposal as published**
Most teams configure their CI pipeline to automatically publish the schema to their registry when changes are merged to the main branch. This ensures the schema registry stays in sync with your production code.
## Workflow Diagram